Bloctime: taking breaks

As both the next steps in my Bloctime project involve taking breaks, I’m going to write about both user story 3 (Take a break) and 4 (Take a 30-minute break) together.

The goal of user story 3 is to allow the user to take a five-minute break after a 25-minute work session. Users shouldn’t be able to begin their break unless they have finished a work session, but once on the break should be able to pause if necessary. Users should also only ever see a single timer and button, regardless of whether they’re on break or working.

The goal of user story 4 is to allow the user to take a longer 30-minute break after they have completed four completed work sessions.

Buttons, buttons, who’s got the buttons?

I originally wanted to use the same button to control all timer activity, but this proved to be slightly too difficult – especially taking into consideration some of the requirements that would eventually need to tie into my app.

So I created a second button that controls the break timer. Both buttons use ngHide to determine which should be shown based on whether my onBreak variable is set to its default of false, when the task button appears, or true, when the break button is shown:

<div class="button-container">
  <div class="button-styling">
    <p ng-class="setButtonClass()" ng-click="toggleTimer()" ng-hide="onBreak">{{ buttonText }}</p>

    <p ng-class="setBreakButtonClass()" ng-click="toggleBreak()" ng-hide="!onBreak">{{ breakButtonText }}</p>
  </div>
</div>


The break button controls both the five- and 30-minute breaks, and uses almost exactly the same function under a different name than that controlling the work session – the only difference is that instead of resetting the timer, the user is able to pause their break.

Time is everything

In user story 3, the idea of constants was introduced. Constants are used whenever variables are known and set, and won’t be changing. I’ve assigned three constants for this project: TIME_TASK, which is the 25 minutes for a task; TIME_BREAK, the five minutes for a normal break; and TIME_LONG_BREAK, which is 30 minutes.

I’ve now got to keep track of quite a lot in the app:

  • The timer needs to stop when it reaches 0, which wasn’t happening in my last post.
  • After completing a work session, the user should be told to take a five-minute break.
  • The number of work sessions needs to be tracked, so that after four completed work sessions the user is prompted to take a 30-minute break.

In order to make the logic of my app easier to understand – and because endless nested if statements hurt my eyes – I’ve broken it down into two functions and made use of Angular’s $watch method.

My first function, checkRunning(), makes sure that a work session is followed by a short break, counts how many work sessions have occurred and stops the timer:

scope.checkRunning = function() {
  if (scope.isTimerRunning === true) {
    $interval.cancel(scope.timerInterval);
    scope.isTimerRunning = false;
    scope.onBreak = true;
    scope.tasktime = TIME_BREAK;
    scope.sessionTracker += 1;
    scope.breakButtonText = "Start break";
    scope.buttonText = "Start";
  }
  if (scope.isBreakRunning === true) {
    $interval.cancel(scope.timerInterval);
    scope.onBreak = false;
    scope.isBreakRunning = false;
    scope.tasktime = TIME_TASK;
    scope.buttonText = "Start";
  }
};

 
expireTimer() stops all timer countdowns at 0. If the user has completed three or fewer work sessions, it does this by calling checkRunning(). If the user has completed four work sessions, it prompts the user to take a longer break:

scope.expireTimer = function(){
  if (scope.tasktime === 0){
    if (scope.sessionTracker <= 3) {
      scope.checkRunning(); 
    }  
    if (scope.sessionTracker === 4) {
      $interval.cancel(scope.timerInterval);
      scope.onBreak = true;
      scope.tasktime = TIME_LONG_BREAK;
      scope.sessionTracker = 0;
      scope.breakButtonText = "Start break";
      scope.buttonText = "Start";
    }
  }
};

 
And this is all controlled using Angular’s $watch method, which, well, watches the value that you give it – in this case, tasktime, which is what I’ve called my timer – and does something when the value is equal to 0:

scope.$watch('tasktime', function(newVal, oldVal) {
  if (newVal === 0) {
    scope.expireTimer();
  }
});


Next

My next task will be to allow a user to input tasks into my app, and then check off when they have completed them.
Bloctime: start and reset a work session

The first user story assigned in the Bloctime project is to allow the user to start and reset a 25-minute work session. Bloc breaks this into two sections: creating a button and tracking time.

Following a suggestion from Mentor Ben, I created a directive that handles the countdown clock and its button. The HTML linked to the functionality I’m going to talk about looks like this:


<div class="timer-content">
  {{ tasktime | timeconvert }}
</div>

<div class="button-container">
  <div class="button-styling">
    {{ buttonText }}
  </div>
</div>

Tracking time

I’m going to look at how I’m tracking time first, as some of my logic in doing this changed how I implemented my button.

One of the parts of learning to program I find particularly difficult is how abstract most of it is. For the past decade, I’ve been working in print design – an obviously visual medium that doesn’t require a great deal of abstract thought. So attempting to figure out how to translate seconds or milliseconds into a display of minutes and seconds was a challenge.

The solution I eventually landed on was to use a filter to convert my tasktime‘s seconds – 25 minutes equates to 1,500 seconds – into a minutes:seconds display.

In what I am learning is fine tradition,  I ‘borrowed’ the code from someone else to accomplish this – although I did rename the filter, as calling it timeconvert made more sense to me than timecode because I’m ‘converting’ the time to display how I’d like it to:

bloctime.filter('timeconvert', function() {
  return function(seconds){
    seconds = Number.parseFloat(seconds);
    if (Number.isNaN(seconds)){
      return '--:--'; 
    }
    var wholeSeconds = Math.floor(seconds);
    var minutes = Math.floor(wholeSeconds / 60);
    var remainingSeconds = wholeSeconds % 60;
    var output = minutes + ':';
    if (remainingSeconds < 10) {
      output += '0';
    }
    output += remainingSeconds;
    return output;
  }
});

Breaking down the filter

Let’s break down CJMatson’s filter.

  return function(seconds){

The first thing that we’re doing is telling the filter to return its result when we run it. This may seem obvious, but I’m often banging my head against my desk in frustration only to realise that while I’ve asked my function to do something, I haven’t asked it to give me back what the outcome is. We’re also telling the filter that it should expect a variable called seconds.

    seconds = Number.parseFloat(seconds);
    if (Number.isNaN(seconds)){
      return '--:--'; 
    }

The above two lines set the seconds variable and provide a default if, for some reason, seconds does not contain a number. The first line makes sure that if tasktime contains a string, it is converted to an integer. The if statement dictates the view should the seconds not return an integer.

    var wholeSeconds = Math.floor(seconds);
    var minutes = Math.floor(wholeSeconds / 60);
    var remainingSeconds = wholeSeconds % 60;

The next three lines make sure things are going to convert and display properly. Using Math.floor(seconds) converts any partial seconds to wholeSeconds, allowing us to then convert those seconds into minutes for the minute variable. remainingSeconds needs to be set because…

    var output = minutes + ':';
    if (remainingSeconds < 10) {
      output += '0';
    }
    output += remainingSeconds;

…when we create our outputs, as in the above, if remainingSeconds is less than 10, we still want it to look like a clock, and therefore a ‘0’ needs to be added before the number.

    return output;

Finally, we ask it to return the final output.

Creating a button

This was, by far, the easiest part.

I started off with a simple <button> that allowed me to start or stop incrementing an integer down using AngularJS’s $interval service. This was fine when I was simply trying to get the functionality working, but is also ugly and horrible and did not provide the look I wanted for this project.

Luckily, as any element can contain an ngClick, simply changing it to a <p> tag has allowed me to not only create more of the look that I’m aiming for, but also to add in a perfect animation (thanks to Animate.css) when the buttonText reads ‘Start’ to draw attention to the fact that you can click it.

The button needed to start the countdown, and when the countdown was running allow the user to reset the countdown process. Here’s how I did it:

    scope.toggleTimer = function() {
      if (scope.isTimerRunning === false) {
        
        scope.timerInterval = $interval(function(){
          scope.tasktime--;
        }, 1000);

        scope.isTimerRunning = true;
        scope.buttonText = "Reset";
      }
      else {
        scope.isTimerRunning = false;
        scope.tasktime = 1500;
        $interval.cancel(scope.timerInterval);
        scope.buttonText = "Start";
      }
    };

If the timer is not running (isTimerRunning = false), clicking the button starts the countdown using $interval, changes isTimerRunning to true and modifies the buttonText to ‘Reset’.

If the timer is running (isTimerRunning = true), clicking the button changes isTimerRunning back to false, cancels the $interval, resets tasktime to 1500 seconds and changes the buttonText back to ‘Start’.

My commit for this step on GitHub

Next

My next task is to let a user begin a five-minute break after their work session.

Introducting Bloctime

As I’m now 100% of my way through Bloc’s apprenticeship programme (according to their tracker) but I’ve got until early February before my term is finished, I’m planning to do as many of the remaining projects as possible.

With that in mind, and as I’d just finished up my first project using Firebase, I decided to do the Bloctime project next. Bloctime is a time-management application based on the Pomodoro technique, which means you have timed work sessions of 25 minutes followed by a five-minute break. After four sessions, you’re prompted to take a 30-minute break instead of a five-minute one. I’ll eventually be using Firebase to track the names of the work sessions.

The following are the user stories I’ll be working through on this project:

  • As a user, I want to start and reset a 25-minute work session.
  • As a user, I want to start and reset a five-minute break after each completed work session.
  • As a user, I want to start and reset a longer, 30-minute breakafter every four completed work sessions.
  • As a user, I want to see a live timer during work sessions and breaks.
  • As a user, I want to hear a sound at the end of work sessions and breaks
  • As a user, I want to record completed tasks.
  • As a user, I want to view a history of my tasks in reverse chronological order.

Because I used Bootstrap on my previous project, I’m not going to be using it on this one – I’d really like to make sure that my knowledge of CSS continues to evolve, and because it’s such a great library Bootstrap does half the hard work for me.

Wrapping up my self-destructing task list

I finished my self-destructing task list project some time ago, but as I’ve been generally crap at updating this blog it shouldn’t come as a surprise that I completely forgot to write about it. I like to think this is not me being slightly useless, and prefer to pretend that I’m just so very busy creating more code that I just don’t have time to record the thought process. ^^

Conditionally applying classes

One of the most difficult things about this project for me was figuring out how to conditionally apply one of three CSS classes.

In story 6, Create new tasks, I’m asked to allow priority selection when a user is adding a task to the list. This in itself was easy enough, using one of Bootstrap’s dropdown buttons and populating the dropdown options with an array defined in my .js file, which also sets an ID for each selection that is stored as todo.priority.

I wanted to communicate the urgency of each task in a simple to understand, visual way that didn’t involve adding any further text – such as ‘Urgent’, ‘High’ or ‘Low’ – to each task. But how could I create an element that would change class, and therefore how it looks, based on the priority selected for each task?

Not a true/false question

At first, all I could find were Stack Overflow were ways to apply a class based on a true/false value; in other words, I could apply one of two classes as long as something evaluated to true or false. This wasn’t what I wanted at all – I needed to apply one of three classes to the same element.

After going round in circles for a while, I finally figured it out. Using ngClass, I then asked my element to check what it should look like using my setIndicator() function:

$scope.setIndicator = function(todo) {
		if (todo.priority == 0) {
			return 'priority-urgent';
		}
		if (todo.priority == 1) {
			return 'priority-high';
		}
		if (todo.priority == 2) {
			return 'priority-low';
		}
	};

This seems straightforward and simple, but – as always – the most obvious part of the above was the part that took me the longest. The key bit that I’d been missing from many of my previous attempts was that I needed to have my code return what the conditional class should be.

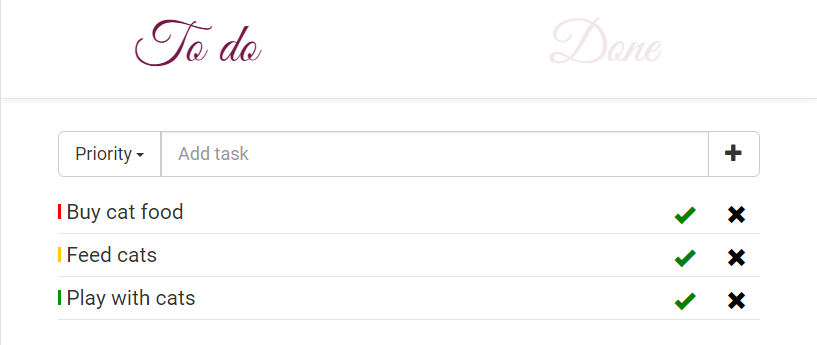
Once that was done, I had a great looking list, helpfully colour-coded by priority; red for urgent, yellow for high and green for low.

sd-tasklist-priority-examples

There are a few more things that I’d like to do with the above – including adding some touchscreen functionality, organising multiple lists and asking users to authenticate to use the app – but what I’ve done so far is the core of the project. I’ll be moving on to the next project and plan to save the extra functionality for when I’ve finished the course and am looking for a developer role.

This project’s repo on GitHub

Bloc Jams with animations: finishing up with flipping album covers

There were two more things that I needed to do to finish this project. The first was to add some basic animations to the text of the Bloc Jams landing page, as well as creating a more complex flip animation on the album covers to make things more interesting. The second was to make sure the Bootstrap grid holding the images was responsive and that it sat in the centre of the page regardless of size.

Flipping animation

I started with adding simple animations to the landing page’s introduction text using Dan Eden’s wonderful Animate.css. This was a very simple addition to my CSS and required the addition of a few classes to my HTML tags. While I’ve written my own basic animations previously it’s fantastic to simply be able to plug in a few lines of code and just have things work.

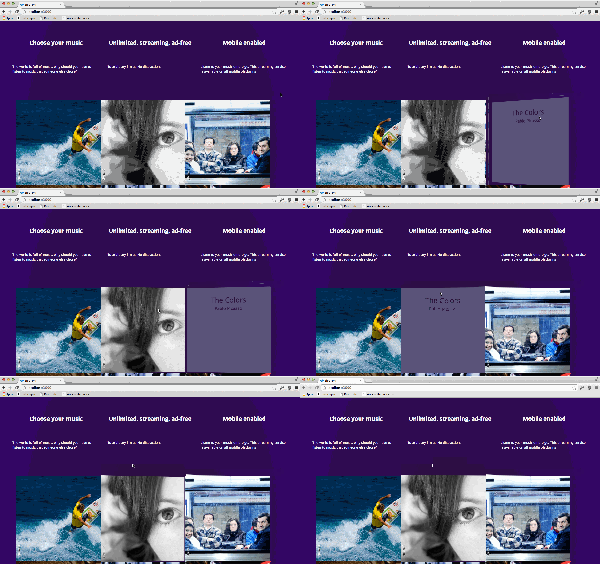
The flip animations needed to function as in the GIF below (created by Bloc):

bloc-jams-landing-album-flip

This was actually super simple, thanks to David Walsh’s post on creating a CSS flip animation. It required a tiny bit of messing around with the CSS in order to position the ‘back’ of the album in the correct place for my project, but otherwise this was straightforward and easy.

My commit for this step on GitHub

Getting the grid centred and responsive

The next step was considerably harder and took me a solid day to figure out. Part of the problem is that when creating the page in the foundation section you start with the following:

<div class="landing-album-list container">
  <div class="row">
    <div class="col-md-4" ng-repeat="albumURL in albumURLs">
      <img ng-src="{{albumURL}}">
    </div>
  </div>
</div>


And after adding the flip animations, this is what I was working with:

<div class="landing-album-list container ">
  <div class="row">
    <div class="col-md-4 flip-container" ng-repeat="albumURL in albumURLs">
      <div class="flipper">
        <div  class="front">
          <img ng-src="{{albumURL}}">
        </div>
        <div class="back">
          <h3>The Colours</h3>
          <h4>Pablo Picasso</h4>
        </div>
      </div>
    </div>
  </div>
</div>


While both the above are using the correct Bootstrap classes container and
row, along with col-md-4 to dictate the width of the items within the row, unbeknownst to me – at this point in the process – was that the default grid isn’t responsive. The grid also automatically aligns left, which, in my opinion, is pretty idiotic – in most cases, while you might want to change the alignment of content within the grid I think that you’d generally want it to remain centred on the page.

In addition, there are some further classes that the img tag requires in order to scale the images as the grid changes in size and that hold the contents of each cell in a row to the centre of that cell.

Finally getting the grid to act responsively had the unfortunate effect of totally ruining the flipping animation, which meant that I had to revisit the CSS for this section. In the end, however, I (mostly) got things appearing as I wanted them. I’m not posting my CSS as it would be easier to see what’s changed through the link to my GitHub repo for this commit below. Here’s what my final HTML looked like:

<div class="landing-album-list">
  <div class="landing-album-grid-padding">
    <div class="container-fluid">

      <div class="row-fluid">
        <div class="col-xs-12 col-md-4 flip-container" ng-repeat="albumURL in albumURLs">
          <div class="flipper">
           
            <div class="front">
              <img class="img-responsive center-block" ng-src="{{albumURL}}">
            </div>

            <div class="back">
              <div class="back-background center-block">
                <h3 class="text-center">The Colours</h3>
                <h4 class="text-center">Pablo Picasso</h4>
              </div>
            </div>
            
          </div>
        </div>
      </div>

    </div>
  </div>
</div>


My commit for this step on GitHub

Next steps

As I’ve now essentially finished this project, I’ll be moving on to my next one: Bloc’s self-destructing task list with Firebase.

Bloc Jams with animations: getting the chevron to turn

One of the suggestions that Bloc makes at the end of the foundation section is that ‘done is better than perfect‘.

I’m mentioning this because while I absolutely got my problem menu chevron to rotate when it’s clicked, I didn’t do it using solely CSS3 transitions/animations as my mentor suggested.

As you can see, I’ve used the ngClick event to trigger the transition. This may be what my mentor had in mind, but as he’d linked me to a post he wrote on CSS Tricks about animations, I somehow doubt it.

However. It works. Correctly. Every time. And I think right now, that’s something to celebrate. (Even if I’m not entirely sure how and why, or if I’ve now got a load of superfluous code that does nothing except for looking pretty.)

There can be only one

In attempting this, I also learned something that is likely obvious to anyone who has been working with Angular for any length of time – in other words, not me.

You can only have one ngApp definition per page/site. As my index page’s html tag includes ng-app="BlocJams", which is how I’ve embedded the rest of the Angular functionality in the page, using the example from Ben’s article on CSS3 animation with Angular didn’t work for me because I was trying to establish a second Angular app within the page.

Figuring this out took a frustratingly long time.

Next up

  • Get the albums on the landing page to ‘flip’, so that when a user hovers over the image it turns over to display the album title and artist name.
  • Get the albums on the landing page to have a max width on the mobile view, and to act as a fluid grid that automatically resizes between a mobile and tablet size.

Bloc Jams with animations: Responsive layout

Well, that goal of posting once a week went out the window, didn’t it?

In the middle of July, just before going on holiday for around three weeks, I finished the Bloc foundation course. Anyone familiar with the Bloc front-end developer curriculum will know that the foundation level involves building a single-page app for a site called Bloc Jams (my repo on GitHub) using AngularJS.

The goal of the foundation level is to introduce you to the concepts you’ll be working with for the rest of the course and mainly involves copying, pasting and walking through why you’re being asked to do what you’re doing.

Now the fun begins

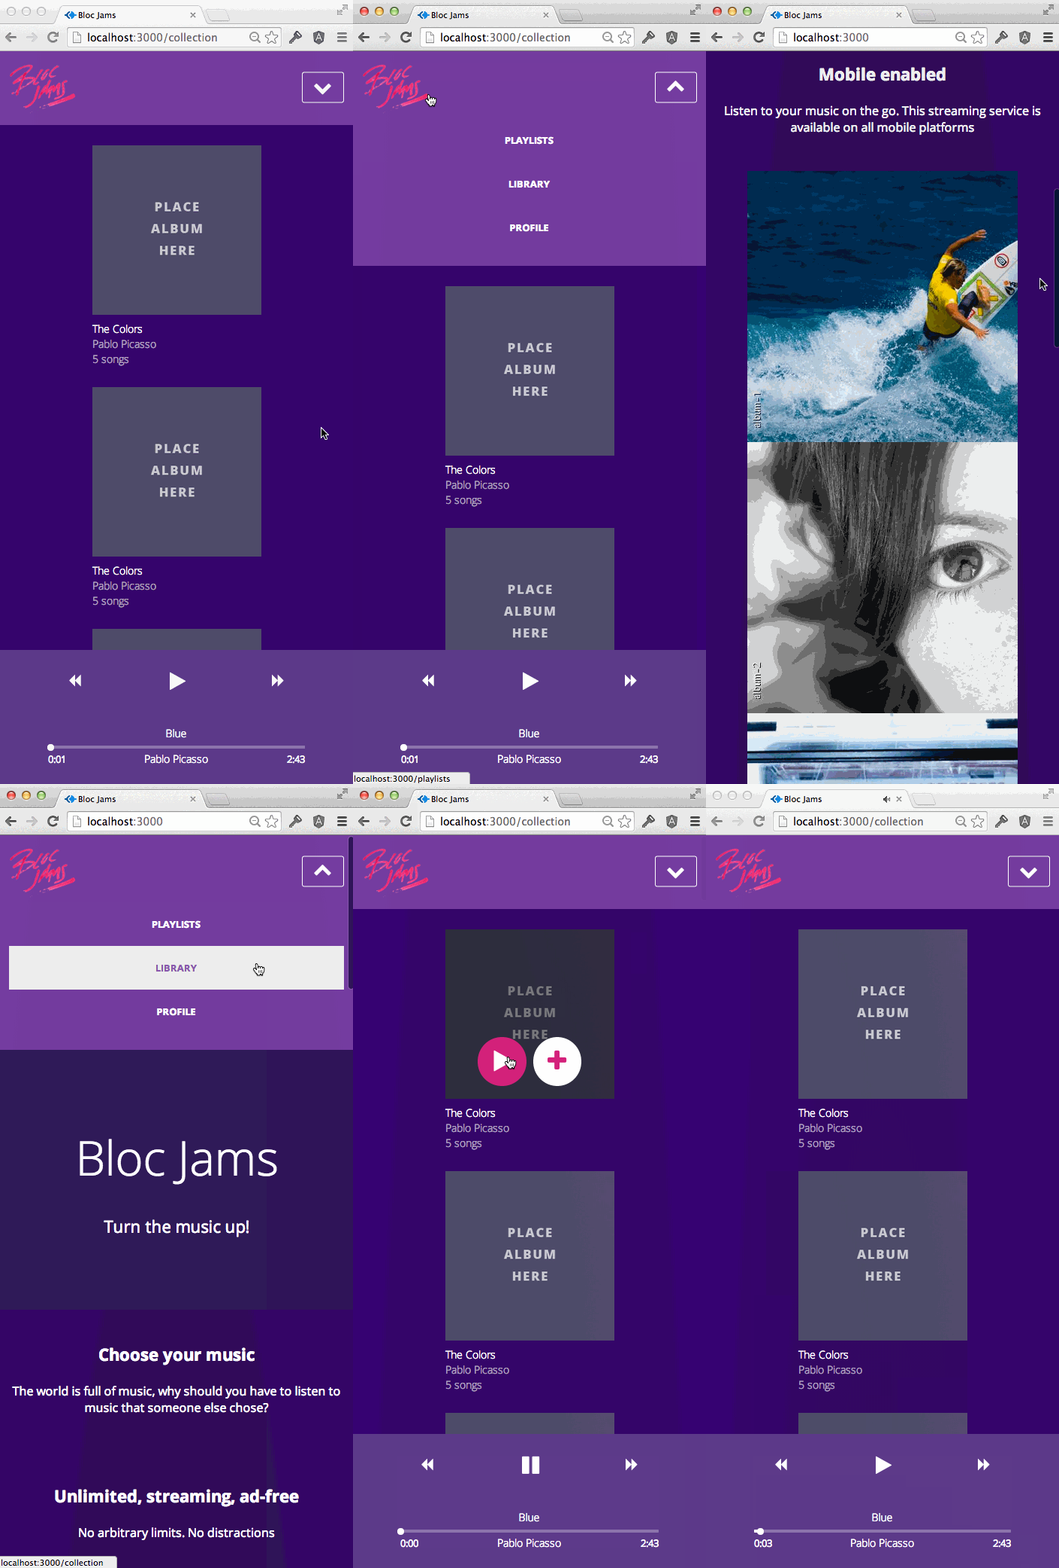
One of the next projects is to take Bloc Jams and make it more mobile friendly, as well as adding in some CSS animations. The first part is to make the app look like the below (created by Bloc):

ngClick or ngAnimate?

Thus far I’ve managed everything bar the dropdown menu – or, at least, getting the chevron in the dropdown menu to animate on click.

I think this is going to involve either the ngClick or ngAnimate functions within Bootstrap, but currently I feel at a bit of a loss. I’ve asked my Bloc mentor, the wonderful Ben Simmons, for help in terms of pointing me in direction of some helpful information, as I’m not sure whether I’m going the correct direction.

An introduction

Well, I’m nearly 42 days into my front-end developer ‘apprenticeship’ with Bloc, and it’s likely past time that I’m writing a post about what I think about it – especially as I applied for (and got) their diversity scholarship, which asks that you blog about the course. First, though, a bit of background.

The accidental career

I’ve worked in business-to-business print publishing since 2006, which depressingly means I’ve been doing it for nearly 10 years. I’m what’s called a sub-editor or production editor – the easiest way to describe what I currently get paid to do is that a load of people give me Word documents and I give them back a magazine. It’s a bit more complicated than that – for example, I’m also a human spelling and grammar checker (which my mother obviously appreciates when I ‘fix’ her Christmas cards), I do picture research and page layout, and I’m often responsible for some aspect of the publication’s website, too.

And just like nearly every other sub that I’ve met, I accidentally fell into the job. A year after I graduated from uni I moved from rural Dorset to London. Where there were, you know, actual jobs. I was hired to work as a receptionist at a small professional members organisation in the City, but shortly after I joined the publications assistant left and I was asked if I’d be interested in changing roles. I was, and thus started an utterly unremarkable career in publishing. There are absolutely some things I like about the job – I really enjoy page layout, for example, and working with editors to create great visuals for their features. And sometimes, the copy is interesting enough that I actually enjoy reading it.

But mostly? I hate it. I finally reached a breaking point last July, when I was stuck in a job that had very much been misrepresented to me during my interview, doing extra hours almost daily for no additional pay or even thanks. So I quit.

Baby coder

I’d love to say that I recreated the quitting scene from Half Baked, but only in my dreams! I’d been working increasingly online prior to the disastrous job and could very clearly see the link between what I liked doing most in print – designing awesome, engaging layouts – and web design. I’ve always been an immensely visual person – my degree is in documentary photography – and my husband, who is a .Net dev, had been trying to push me towards web design for some time. So that’s what I decided to do.

I started with Lynda.com, as that was how I managed to learn enough HTML skills in order to get a previous role. I then found Treehouse, Codecademy and Code School, and started going through their front-end tracks/suggest programmes. I spent about six months trying to learn through the above websites with a greater or lesser degree of success.

I was starting to get frustrated, though – I felt like I had a load of puzzle pieces but no idea how they went together, or even if they were all for the same puzzle. I didn’t yet know enough to be able to self-direct; after all, when you don’t know what you don’t know, you certainly don’t know how to start small and then gradually increase the complexity of a project in order to keep learning.

Thinkful

Then in January this year, I started Thinkful’s front-end web development course. It sounded perfect to me: I’d have a mentor, so someone I’d be able to bother about the questions I had; I’d be working on projects aimed at taking me from a basic level up to someone better able to handle the complexity that modern web development requires; and it sounded like I might be able to move into a job in web development at the end!

The Thinkful course was absolutely worth it – although there is also absolutely no way that you come out of it ready for employment as a front-end developer. It was, however, a great introduction to front-end web development and all that it entails. My mentor was fantastic and really worked to make sure I was understanding the material.

As I was coming to the end of the Thinkful course, I was struggling to decide what to do: I knew that I definitely did not yet have the skills to try to get even a junior job as a front-end developer, but wasn’t sure if any of the other bootcamps out there would be more useful than Thinkful. Then I heard about Bloc.

Bloc

I’m going through Bloc’s frontend developer track on the 36-week timeline – after all, I’ve still got to pay the bills. I’m nearly at the end of the Foundation section, and have really been enjoying it. If I hadn’t done the Thinkful course, there’s no way that I could be progressing through the Bloc material as quickly as I am; I simply wouldn’t have had the understanding needed to actually get what I was being asked to do.

I’m going to attempt to provide weekly updates on what I’m working on and what I’m learning, but as I started this post on Monday and it’s now Friday, we’ll see how that goes!